Showing posts with label prototype. Show all posts

2011-06-14

The End of Hearing: building the implants #4

The blisters are now ready.


So far I have only 30 implants assembled, so I cannot use all the packaging I produced, but after June 14th (after the private view) I will be soldering more of them. I plan to have 60 implants in total to give away to people visiting my project and sharing their feedback.

Below: blisters with AIR implants inside and a close-up of the AIR implant. Looks pretty sinister, I hope.


The End of Hearing: building the Otomixer #5

Finally it's ready.


The Otomixer is working well, is looking good, and is making people curious.

Next thing to do is to film it and use the footage in a publicity release film I am going prepare for the show (it will communicate each scenarion separately, all of them as a general theme, as well as how the viewers can participate in the project).

All effort can be now directed towards making the blister for implants and creating the films.

The End of Hearing: building the implants #3

The box with foam filling did not work really well as a packaging for the implants. First of all it had a rather "home" touch and a "friendly" feel. I do not want it to look like that—this is an electronic device, which is supposed to be planted inside newborns' brains after all.

So I decided to create a blister. Because there is probably no blister of this size available in the market, and because I wanted it to be rather rigid and strong, I decided to create my own blister desing and vacuum form them using 1mm acrylic.

Below you can see the form I created. Thanks a lot to Melvin and Billy for hepling me out with routing the holes. The mold is equipped with a number of 1mm holes, through which air will be sucked out (2 holes in each implant nest, 4 holes in the corners of the mold (to prevent acrylic wrinckling in that areas) and 5 holes along the axis of the mold.


I made around 30 vacuum forms, around 14 of which are actually looking good enough to be used.

Another thing is the back of the blister... it turned out that finding an adequate material and processing it took me even more time that making the blisters!

2011-06-13

The End of Hearing: building the Otomixer #4

When I came back from Gdańsk there was really no time to waste. On the very same day when my plane from northern Poland had landed in Luton, I went yet again to the workshop to continue my work on the Otomixer.

It took me a day to adjust the size, prime and paint the pre-laser-cut Otomixer main control panel. After assembling empty vials and plugging in the headphones, the device looked like this:


I took me several days to seal all the vials and pour the liquids into them. I used three food colourings (yellow, green and red), potassium permanganate (purple) and india ink (black). Vials are sealed with a termoplastic resin, which I got from my grandfather (it was used in Polish radio industry in the '70, but still does an excellent job).


Soon afterwards I started to assemble all necessary electronic components. Eventually, I manage to fit in 2 amplifiers (based no the stethoscope design that I build before) and an equaliser (5 band, instead of 6 band, which I used previously, but this is still the same circutry). It works all fine, and is pretty exciting when you can equalise the same voices you can normally hear around you (it's actually live equalisation). Unfortunately the differences in frequencies are not that distinct (even though I used capacitors ranging from several hunderds of pF to 10.000 times stronger ones of uF value)... This is something I might want to work on later on, improving my electronic circutry skills at the same time.

2011-05-19

The End of Hearing: building the Otomixer #3


Today I bought half a liter of white primer and half a liter of white glossy paint, and I gave the Otomixer its lovely, elaborate, bespoke colour—clear, neutral white. I decided to keep it white for several reasons:
• it is a medical appliance, therefore it needs to fit our expectations of such device;
• it is a tool of the future, and future is clean and sterile—at least in science fiction that I read;
• it is the best colour for something that does not exist (yet!);
• it will be a nice background for the glass vials with vividly colourful liquids;
• it will help focusing on what the tool does, rather than how it looks like, which is what I hope for.


The final coating of the Otomixer can be seen above. Of course I could not stop myself from spraying too much paint, which proves the old saying from my homeland right: "the very good is the worst enemy of the good"...

Tomorrow I will start mounting the glass vials on the top of the Otomixer, cleaning the jack sockets, installing 4 bumpers to the base, laser cutting the front panel and of cause installing the equaliser mechanism (this however, will not take place in the workshop due to the fact that dust might not be beneficial for electronics).

2011-05-17

The End of Hearing: building the implants #2

So apart from 60 ready to use radio receiver implants, I will need to present them in a way to the audience, and also think of how to give them as a reward to those, who decide to help we with the feedback.


I tried out using an old ink pen box, but it does not work really, makes the whole thing look rather cosy and gives a wring impression about the nature of the implant. It probably need to be more medical, with an edge, a bit like medical devices opened from a disposable septic packaging and then disposed into a bin with other tools heading for a hot, bubbly, germ-killing bath. Or something like a metal tray with meat in Marks & Spencer (btw, what a criminal waste of materials and resources!).

All this needs some thought.

The End of Hearing: building the implants #1

Apart from the Otomoxer, I need to build a number of working radio implants. This is the physical part of the "Voices inside my head" story, where a possibility of having a radio receiver implanted into the cochlear nerve is discussed.

I ordered sixty germanium OA91 diodes, which proved to work well before. Apart from that I need capacitors and induction coils.


Although previously I had managed to tune in to talkSport at 1089 kHz, the signal was rather weak. This is because I had picked the value of the capacitance imprecisely. Later on I managed to tune in to BBC radio 5 at 909 kHz. I used a pair of 390 pF ceramic capacitors (joint capacitance = 780pF) and a 39 uH inductance coil. This makes the circuit resonate at 912 kHz—almost precisely at the wavelength of BBC 5!

I will assemble 50 "BBC radio 5" receivers and 10 "talkSport" receivers. I hope all these will work in the Rochelle School during the show. One of my concerns is the roof, which is made of tin-clad. This might hinder the reception. Another issue is the antenna—should I organise a more professional one, or stick to the simple wire, which has been working to a better or worse extent all the time now?

The End of Hearing: building the Otomixer #2


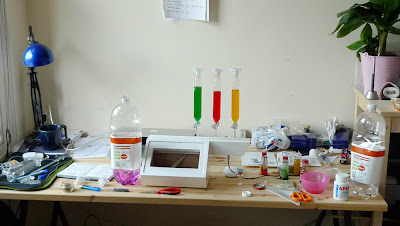
Today I managed to successfully glue all Otomixer bits together.
The whole thing is rather solid and heavy—I did not expect it to be that big.
But the glass vial I also have to use with the prototype are big themselves, so they in a way dictated the scale of the Otomixer.


Yesterday I soldered a small board with two stereo 3mm jack sockets and cables: there is only one cable connected to both input channels, so de facto it is a stereo socket providing only mono output. But this is enough for me and for the project—anyway, the equaliser inside the otomixer has only one channel as well, so it just needs to be the lonely mono.


After gluing everything together and just after I started filling all gaps and holes with putty—I realised I confused the side that the vial block is pointing towards! It is mirrored—the other way round than I designed initially. But it turned out to work not bad at all, if not even better. At least for a left-handed person...


Tomorrow I wish to start impregnating mdf and priming it. I will see how long will it take, but maybe I will also be able to put the first layer of white paint...


On Friday I will have the main panel laser cut in the Southampton Row basement. Then it will only need to have the equaliser mechanism with the potentiometers fitted, glass vials mounted and sealed dry, as well as a pair of rails installed at the end of the Otomixer arm, where the compound will be extracted. Not that much...

2011-05-16

The End of Hearing: building the Otomixer #1

So as part of the show set and the whole project, and the general method I am using in my work right now—I started building a speculative/fictional/God-save-us-from-it object. It is the Otomixer—a tool for regulating one's hearing. By adjusting the frequency bands of your hearing with the equaliser sliders you can customise your own ototoxic compound, take it and experience hearing loss according to your settings. It can be in effect from as short as 4 hours, to as long as one's lifetime—so use the timing know with care!


I started building the Otomixer in Central St Marintn's wood workshop in Southampton Row building last week. And this is the nicest workshop I've ever been to (I've been to three, worked in two). They've got plenty of nice, old, sturdy machines, which are pure pleasure to use. This is actually the last year anyone can use those facilities in the epic Southampton Row building, because everything's moving to King's Cross in summer. Lucky me!

I will publish some pics with the workshop itself, because I feel it's just too much pity to have it forgotten. I wish to remember working there...

2011-04-12

The End of Hearing: radio implant working!

The first radio implant was a nice and handy mock-up. Recently, I reconsidered different ways of improving it and also making it work. It received an additional leg (the one coming out of a germanium diode) and is even smaller. But most importantly—it picks up radio signal. It is fixed tuned to 1073kHz (in London you'd hear talkSport radio on these wavelengths). With an amp, antenna and ground it is possible to listen to it using standard headphones.


I am planning to build one hundred of these working radio implants and give them as a reward to people who decide to give me feedback on my project. It will be an unusual opportunity to take away a piece of work shown in the gallery and also a small memento reminding of what my project is about—the emerging end of our hearing.

The End of Hearing: equaliser

After a long and painful struggle, I managed to build an equaliser—the heart of the future otomixer, which is an object appearing in the story about artificial silence. The equaliser has 6 bands (band #1: frequency 50Hz [100nF capacitor used]; #2: ~100Hz? [50nF]; #3: ~250Hz? [25.3nF]; #4: 500Hz [10nF]; #5: ~1000Hz [6.8nF]; #6: 1600Hz [3.3nF]) and still generates a bit too much noise, but it is negligible in the project and can be sorted later on.


The equaliser (on the left half of the breadboard) is connected to an amplifier (on the upper right side) through an audio transformer (big single part in the middle). I used a LM741 IC for the equaliser and a LM386 for the amp. I still think if it is advisable to show the mechanism of the equaliser in the final show or hide it inside a nice futuristic casing...?

2011-03-12

Future Soundscapes: stethoscope in stereo

Recently I've been working on building a stereo stethoscope for my project. I managed to connect two microphones to line via a separate set of amps and transistors, so they work independently. Somehow the lines are not fully separated, but just pick one of the signals stronger... This remains to be solved—probably the solution is closer than I could ever imagine. Yet, one never sees one's nose, although it is always the closest object to one's eyes...


Imagine what would happen, it the microphones were connected with e.g. 50m long wires and you could listen really close and simultaneously to things that happen in 100m distance from each other, to those tiny sounds audible only to someone being in a very certain spot... What would this mean and what kind of detached experience would a listener have? And what about wires 500m long? You'd be able to eavesdrop on things taking place 1km apart, but you'd probably not see it.

2011-03-08

Future Soundscapes: stethoscope prototype

During the Industry Event alongside the scenarios I presented one prototype, which could accompany one of the scenarios ("Artificial Silence").


It is a simple stethoscope based on a Greman design I found here. I managed to improve it for my purposes and gain a greater amplification, however at the expense of increased circuit noise. Nevertheless, the whole prototype may work as a simulator for introducing the concept of noise vaccination (desensitisation to sounds of a certain loudness, which in practice means decreasing human hearing sensitivity). By adjusting the potentiometer in the middle, one can see how silence might look like after the vaccination, where on this scale is normal human hearing sensitivity and how loud to a person before the treatment might become vaccinated person's normal sound intensity level.

2010-05-13

Noisecode applet


Here is the link to the latest Noisecode applet developed in Processing.
It is combined with a virtual custom Noisecode keyboard, so it is possible to exercise all it's functionality.

It is either for Mac:
http://www.marekkultys.com/applet/02/noisecode_0514a.app.zip

and for Windows:
http://www.marekkultys.com/applet/02/noisecode_0514a.zip

Although I made all effort to clear the applet from bugs, I cannot take any responsibility for possible surprises caused by the applet on your computer.

2010-02-15

noisecode: keyboard

The first applet simulating noisecode keyboard can be viewed here:

http://www.marekkultys.com/applet/01/applet/index.html

Up to now noisecode has been available in 'read-only' version.
Now it has became interactive, enabling the viewer to translate any text.

2010-02-03

yesterday: pacing


This is a second attempt to encode text using noisecode. Here the length of single noise sounds are adjusted to keep up with pacing of the song. As visualised typographically—certain noises have been extended in time to match the lilt, while others have been respectively compressed.
The overall effect should mimic singing of lyrics in 'Yesterday'.

yesterday: monospace


This is the first attempt to translate a commonly known piece of text into noisecode using the new English digraph and trigraph rules. I chose 'Yesterday' by the Beatles for it's steady rhythm and varied syllable pacing in the two initial stanzas—vowels can be heard occurring with a certain regularity. Apart from that there is a significant number of digraphs that could be exposed in it.

In this particular case all noises used for encoding letters are in monospace form—each noise has the constant length of 0.2 second. This is particularly useful for hearing rhythmic occurrence of vowels marked by the distinguishably higher pitch (mains hum 60Hz) heard in vowel noises.

2010-01-24

arduino: traffic lights


During Arduino workshop I developed a traffic lights set with 3 different modes controlled by an ambient light sensor and a potentiometer:
• day-light mode—green light and red light flashing phases are the same length—active when reading from the light sensor are above a certain threshold;
• night-light mode—green light phase is twice as long as the red light phase—active when reading from the light sensor are lower than the threshold (sensor gets covered with a finger in the video);
• alert-mode—only the yellow light flashes—active when reading from the potentiometer is below an assigned value.

The whole piece is quite simple, but proved quite useful to understand how to actually write code myself. The code can be viewed >>here<<